OAuth 2.0: Resolve issues linked to the implementation of SAML2 bearer
With the multiplication of cloud infrastructure and solution providers, it is becoming increasingly complex to find one's way around when it comes to identity and authentication.

Introduction: Can you use OAuth and SAML 2.0 bearer together?
When we hear SAML and OAuth 2.0 in the same sentence, it’s because they’re being compared as two different protocols, and we want to know which one will suit our needs best.
But sometimes, you need to have both of them working together in a single authentication scheme for your client.
That’s what happened to us at Nodata where we use OAuth 2.0 as the authentication and the authorization request layer and were forced to find a solution to authorize our clients using SAML within their organization to query our APIs. We had to find a way to integrate their SAML protocol into our pre-existing OAuth 2.0 implementation with only modifications on our side.
How to install SAML and OAuth 2.0 in a single authentication scheme?
There is an RFC for an OAuth 2.0 extension that does exactly that: RFC 7522 Sadly, it only describes a small part of the flow and doesn’t cover anything before a SAML bearer assertion has been retrieved.
We worked on it, and we succeed, now we want to share with you our knowledge to help you to implement SAML 2.0 bearer.
The implementation of SAML 2.0 bearer in theory
The biggest part of the implementation is pretty straightforward, especially if, like us, you already have the OAuth 2.0 endpoints, and you’re already familiar with the SAML protocol. The /authorize and /token endpoints are already available.
All we have to do is update them, so they can manage the SAML 2.0 bearer grant type and find a way to integrate them with the SAML IdPs into a single flow.
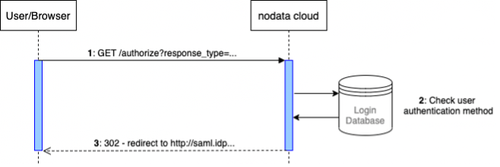
As such, the /authorize endpoint, once called (1), checks for the user-registered authentication method (2), and if SAML is found it will issue a 302 – redirect leading to the user’s SAML Identity Provider (3). For those familiar with the SAML flow, you’ll recognize a similar start.
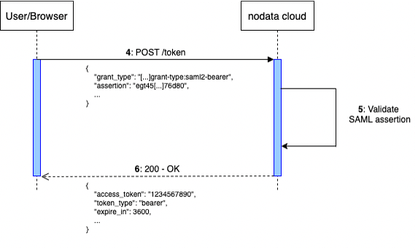
The /token endpoint, once called (4), validates the SAML 2.0 assertion received in the JSON payload (5) and, if valid, issues a response containing a JSON object with access to a refresh token, its lifetime, etc… (6).
So far so good, we stuck with the RFC and everything was implemented as described, and we even managed to integrate the SAML IdPs flow into the process, or so it seems… With our two endpoints now able to deal with the SAML 2.0 bearer grant type, all we have to do is to use them in a single flow, right?
Well… It seems it’s not going to be that simple…
The ugly truth and how to get around the issues
Incompatibility between the two protocols.
RFC describes a perfect world where every piece of the equation is able to deal with the OAuth 2.0 framework. Whereas in the real world, you have to deal with pre-existing pieces of technology that don’t know and don’t care about OAuth 2.0.
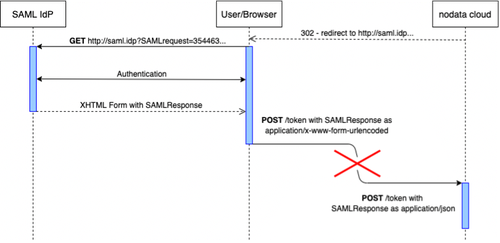
On one hand, we have a SAML IdP following the SAML protocol, which means that once the user logs are validated it responds with a form the user-agent will POST to what is called the ACS (Assertion Consumer Service). This ACS should logically be the one to validate the SAML 2.0 assertion received through the form. You can see what a SAML IdP response looks like here.
On the other hand, we have the /token endpoint which expects a JSON object containing the requested grant type, the SAML bearer assertion, etc.
A solution to have those two protocols work together has to be found, so we can fill the hole left in the sequence.
How to format the SAML response
The first observation we can make is that we need to find a way to format the SAML IdP response to JSON. This can theoretically be done either client-side or server-side.
Since the SAML IdP needs a POST endpoint to act as ACS, we can declare a formatting endpoint to act as such (instead of the /token endpoint).
This means we have to choose the server-side solution and to avoid having to deploy the same endpoint multiple times, the best place to do this is in our cloud.
That way our new /saml-to-OAuth endpoint will receive the SAML 2.0 response encoded as application/x-www-form-urlencoded, create a JSON object with it and return it.
But we’re not done yet, as another subtlety awaits us around the corner.
Final step: A wild CORS issue appears
So, now we have our formatting endpoint acting as an ACS and you may think all we have to do is to retrieve the formatted response. But sadly, it’s not that simple.
The whole process, starting at the call to the /authorize endpoint, takes place in a pop-up so that the current context of the application can be preserved more easily. Thus, if we just return the formatted JSON object in the response payload of the /saml-to-OAuth call, the pop-up will end up displaying it. But it also means the pop-up ends up on the Nodata cloud domain, while the application main window remains on the client authentication domain. This means that we cannot access the pop-up from the main window, because, as you may know, the browser restricts us to access a pop-up as soon as it leaves its original domain.
Lucky for us, there is a way to transfer data between two windows on different domains: the JavaScript postMessage function.
PostMessage to the rescue
This JavaScript function is meant to send a message from one window to another one, especially if those are on different domains. Obviously, there is a way to secure this transfer by specifying the target domain of the message. That way, other windows won’t receive it.
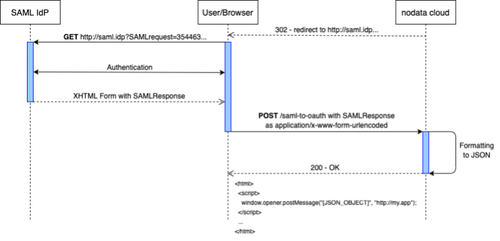
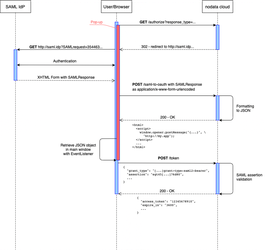
The next step is to format the endpoint to respond with an HTML page containing JavaScript code using window.opener.postMessage("[JSON_OBJECT]", "[APPLICATION_DOMAIN]") to transfer our object in-between two domains, from the pop-up to the main application. Setting an EventListener on the application's main window now allows us to receive the message and parse its content. The application can now request a security token type with the received JSON object and use it to access our Cloud-protected resources.
The final sequence looks like that. 👉
Conclusion
While what was presented here is a working solution, it’s not the only one. We hope this information about those providers can be useful, and feel free to contact us to share your solution and comments.
Related Articles

IT
How is the maintenance at Nodata ?
Maintenance operations are supervised to control access to data by service providers.
Read the article

IT
OAuth 2.0: Resolve issues linked to the implementation of SAML2 bearer
With the multiplication of cloud infrastructure and solution providers, it is becoming increasingly complex to find one's way around when it comes to identity and authentication.
Read the article